Showing posts with label Recipes. Show all posts

Tuesday, November 20, 2012

Making Your Home a Haven: Cooking

Ya gotta love Courtney over at Women Living Well and her ideas for the Making Your Home a Haven fall challenge.  This is my second year participating and it's just so meaningful.  The first week was focusing on lighting a candle every day; last week we added quiet (and sometimes not-so-quiet) music; and this week, the third part of the challenge is cooking!

Courtney has a great post about cooking and, if you have kids, including them in food preparation.  Check it out!  It's the perfect week for this part of the challenge. :)

As for me, I'm going to link you to some of my family's favorite Thanksgiving recipes--easy and tasty!

Here's a cranberry-ish dish that even children love.  As a matter of fact, children probably love it more than the adults do, but most adults like it as well. ;)  Cranberry-Raspberry Salad

An alternative to pumpkin pie, this one has won over even kids who don't particularly like the pumpkin in pie.  Pumpkin Pie Cake

Here's a fancy, but easy, way to fix corn for any dinner.  Triple Corn Casserole

This one is a little Thanksgiving treat that you'll want the kids to help with!  Pilgrim Hat Cookies

Happy Cooking!  Happy Thanksgiving, everyone! :)


Tuesday, October 30, 2012

Pumpkin Pie Cake


Gotta love pumpkin "stuff" this time of year!  Here's one that's easy, easy . . . but so yummy.  I took this to some friends' house the other night and even all the kids (all boys even, mind you) loved it.  Or they were being very polite.  But it's hard for boys to be that polite without a hint of a grimace when they don't like something.  Yep, it's a winner I'd have to say! :)

Pumpkin Pie Cake
a.k.a. Pumpkin Dump Cake

1 (15oz) can pumpkin
1 (12 oz) can evaporated milk
3 eggs
1 tsp nutmeg *
1/2 tsp ginger*
1/2 tsp cloves*
2 tsp cinnamon*
*OR 4 tsp pumpkin pie spice
1/2 tsp salt
3/4 sugar
 ----------------------
1 (18.25 oz) yellow cake mix
1 cup walnuts (I omitted these, which probably helped with the boys' approval)  ;)
3/4 cup or 1 1/2 sticks butter, melted

Preheat oven to 350 degrees F.  Lightly grease 9X13 pan.  Completely combine first set of ingredients.  Pour into prepared pan.  Sprinkle with cake mix.  Gently pat down with spoon.  Sprinkle with nuts, if using.  Drizzle with butter.  Bake for 50 minutes.*  Cool and cut in squares.  Serve with or without whipped cream.

*I had to bake it 10 extra minutes, but ovens are different, so watch it carefully.

Enjoy!

Thursday, June 7, 2012

Hearty Baked Beans

This is an old Taste of Home recipe I've made in the past, and I took them to one of our many family gatherings in the past couple of weeks.  These are great for a carry-in (or potluck--for some reason, it's called a "carry-in" in our neck of the woods! lol) or a large family get-together, because they are tasty and the recipe makes a lot!  You can follow the directions here, or just throw everything in the crockpot and cook for a few hours (well, make sure the meats are cooked before they go in the crockpot!).


Ingredients

  • 1 pound ground beef
  • 2 large onions, chopped
  • 3/4 pound sliced bacon, cooked and crumbled
  • 4 cans (15 ounces each) pork and beans
  • 1 bottle (18 ounces) honey barbecue sauce
  • 1 can (16 ounces) kidney beans, rinsed and drained
  • 1 can (15-1/4 ounces) lima beans, rinsed and drained
  • 1 can (15 ounces) black beans, rinsed and drained
  • 1/2 cup packed brown sugar
  • 3 tablespoons cider vinegar
  • 1 tablespoon Liquid Smoke, optional
  • 1 teaspoon salt
  • 1/2 teaspoon pepper

Directions

  • In a large skillet, cook beef and onions over medium heat until meat is no longer pink; drain. Transfer to a 5-qt. Dutch oven. Stir in the remaining ingredients.
  • Cover and bake at 350° for 1 hour or until heated through. Yield: 18 servings.

Triple Corn Casserole

A tried and true recipe--everybody loves this one!


Ingredients
  • 2 eggs
  • 1 cup sour cream
  • 1/2 cup melted margarine
  • 1 16 oz can creamed corn
  • 1 16 oz whole corn (drained)
  • 1 box Jiffy cornbread
  • Colby cheese, grated (probably 4-6 oz, depending on how cheesy you want it!)

Directions:
Combine everything except cheese and place in a 9"x13' greased pan.  Bake at 350 degrees for 35 minutes.  While hot, top with grated Colby cheese.  (I put it back in the oven for maybe 2 min. to let the cheese melt better.)

Sugar Cookie Bars

My brother-in-law in particular was partial to these.  This is an easy and fast way to make sugar cookies, and you can color the frosting to suit any season or holiday.


1 cup butter; room temp.
2 cups sugar
4 eggs
2 tsp vanilla
5 cups flour
1 tsp salt
1/2 tsp soda

Cream butter and sugar until fluffy. Add eggs, one at a time, mixing after each egg. Add vanilla & mix well. In a separate bowl combine flour, salt & soda & stir with a whisk to combine. Add to wet mixture and mix just until combined. Spread on a greased baking sheet (use a 13 x 18 pan). Bake at 375 degrees for 10-15 min, until light golden brown or until a toothpick comes out clean. Cool completely and frost.

Buttercream Frosting
1/2 cup butter; room temp
1/2 cup shortening
1 tsp vanilla
pinch of salt
4 cups powdered sugar
5 Tbsp milk
food coloring (if desired)

For frosting combine butter and shortening until smooth and creamy. Add vanilla and salt. Add powdered sugar in 1-2 cup increments until combined, then add milk & mix until smooth and spreading consistency. Spread over cooled cookie, then cut into bars.  (Mix in milk a tablespoon at a time, because you may not need it all.)

Orange White Chocolate Muffins

These were a refreshing change--I had never made them before.  Everyone seemed to love them, so this a "keeper" recipe for me. :)


Ingredients
  • 1 2/3 cups flour
  • 1/3 cup cornmeal
  • 2 teaspoons baking powder
  • 1/2 teaspoon baking soda
  • 3/4 cup sugar
  • 6 Tablespoons vegetable oil
  • 1 egg
  • 3/4 cup milk
  • 1 orange (zest and juice)
  • 1 cup white chocolate chips
Instructions
  1. In a large bowl, whisk together flour, cornmeal, baking soda, baking powder, and sugar.
  2. In a measuring cup, mix together oil, egg, milk, the zest from the orange, and the juice of that orange.
  3. Pour the wet ingredients into the dry ingredients. Mix until it just comes together. It will be lumpy and that is okay.
  4. Stir in 3/4 cup white chocolate chips.
  5. Line a muffin tin with paper liners. Divide the batter into cups. Sprinkle the tops with the remaining chocolate chips.
Bake in a preheated 400 degree oven for 20 minutes. Cool on a rack.

I got the recipe here, and she has more pics of the ingredients and the process. :)

Thursday, March 1, 2012

Comfort Chicken Soup

I don't intend for this blog to become solely a recipe blog, but I haven't posted in awhile, and about all I've got time for right now is a recipe.  It's one several people have asked me for anyway, so why not? :)

My beautiful friend Suzanne (who lives in the middle of nowhere on a farm in Minnesota, and knows what winter is all about!) sent me this recipe years ago, and on chilly evenings my guys love when I make this simple soup.  I'll give you the recipe in its original form first, then tell you some different things I add to it.

 Comfort Chicken Soup

8 cups water
8 cubes chicken bullion or equivalent amount of chicken soup base (or 8 C already-made broth)
6 1/2 cups wide egg noodles, uncooked
2 (10 3/4 oz) cans cream of chicken soup
3 cups cooked chicken, cubed or shredded
8 oz sour cream
Garnish:  fresh or dried parsley to taste

Bring water and bullion (or broth) to a boil in large soup pot over medium-high heat.  Add noodles and simmer, uncovered, for 10 minutes.  Stir in soup and chicken; heat through.  Remove soup pot from heat; add sour cream.  Sprinkle with parsley to taste.  Serves 4 to 6.

A few of my own notes:
  • To avoid curdling of the cream soups and sour cream, I whisk those together in a bowl, and then "temper" them, by adding a spoonful of the boiling noodle water, mixing it in, adding another spoonful of water, and so on.  I just keep adding water until it seems like it's going to be okay to add the mixture to the noodles. :)
  • I stopped trying to measure the noodles.  I usually just dump a bag of them in--probably about 12 oz. :)
  • You can add carrots and/or celery for some extra color and flavor.
  • Hubs likes spicy stuff, and, though I don't make this hot-spicy, I do add herbs and spices, usually a mix like Chef Paul's Poultry Magic or McCormick's Monterey Chicken mix.
  • I don't know if we eat smaller than average servings, but it sure seems like it makes way more than 4-6 servings!  This recipe usually lasts our little family of three for 2 dinners and a lunch! :)
Enjoy!

Monday, February 20, 2012

Melting Moments Cookies

If you've been here before and don't recognize the name of this blog, see here for the explanation. :)

So, we've been pretty much sticking to a "no eating sweets at home" policy for awhile now.  We have made exceptions here and there, and that would include today. :)  Actually, yesterday, too, when I made apple pie dip & cinnamon-sugar tortilla chips.  At least that one was fruit-based, and I could lessen the amount of sugar a bit. Today is just an all-out indulgence, and will not be repeated for awhile! :)

This recipe is my mom-in-law's, and I found it in a cookbook from her church that she sent me.  Yvonne, my mom-in-law, wrote this note with the recipe:  "My mother used to make these cookies, and, yes, they do melt in your mouth!"  Kevin remembers his mom making these, too.  Little Mister and I were duly impressed by the melting factor.  One can't help wondering how it happens.  Sounds like a science experiment in the making for a certain curious young guy I know. ;)

Here's the recipe:


Melting Moments Cookies

  • 2/3 cup cornstarch
  • 1/3 cup powdered sugar
  • 1 cup unsifted flour
  • 1 cup butter
  • 1 tsp vanilla

Cream together butter and powdered sugar.  Add remaining ingredients and drop by small teaspoonfuls on baking sheet.  Bake at 300 degrees for about 15 minutes.  Do not let brown.  You may sprinkle the warm cookies with additional powdered sugar if desired.

That's it!  Easy and just a few ingredients. 

I have no calorie info for you.  I don't think I want to know. ;)  One thing I'll probably do differently next time is shape the dough better when I put it on the pan.  There was no picture, and I thought they would flatten out to a round shape, so I just kind of dumped blobs of dough.  They're not very pretty. lol  Not that my guys will care in the slightest what they look like!

A word about our most of the time sugar-free home.  We're not going crazy with it.  As I said, we do make exceptions sometimes.  And it's not as boring as it might sound.  We have great snacks, like wonderful fruit-smoothies, veggie wraps, nuts, etc.  The only "artificial" sweetener we use is Truvia (stevia) because it's the only one we're aware of that is actually natural and not dangerous in some way.  Anyway, we figure if we stay away from sugar at home most of the time, we can guiltlessly enjoy sweets in moderation when other occasions call for them--and, believe me, we do! 

Wednesday, December 28, 2011

The Best Mini Ham & Cheese Sandwiches

These are a hit every year at our family Christmas Eve gathering!


Mini Ham & Cheese Sandwiches

Sauce:
1 stick butter
1 teaspoon dry mustard
1 teaspoon Worcestershire sauce
1 1/2 teaspoon dried minced onion
1 1/2 tsp. poppy seeds

Sandwiches:
2 dozen brown & serve rolls
ham
Swiss cheese
(use as much or as little ham and cheese as you wish)

Cut each roll in half horizontally and assemble sandwiches with ham and cheese.  Place sandwiches in a baking pan.  Melt the butter and add remaining sauce ingredients.  Pour over sandwiches.  Bake at 350 degrees until browned.

Another option is to soften the butter instead of melt it, mix with remaining ingredients, and spread the butter mixture on the tops of the sandwiches.  This takes a little longer but helps distribute the poppy seeds more evenly. :)

Sunday, December 4, 2011

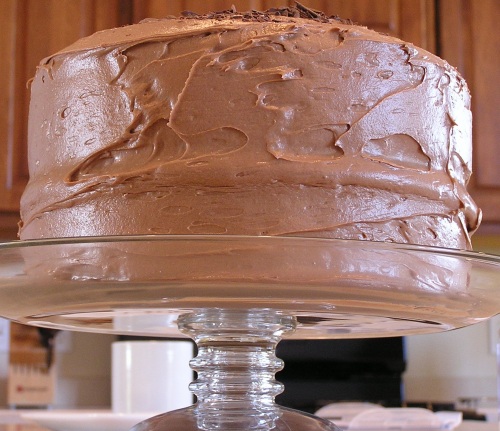
Chocolate Cake to the Max

The story behind my husband's request for the same birthday cake every year goes something like this:

Nine years ago, I was thumbing through a Better Homes & Gardens magazine and came across a recipe labeled, "Chocolate Cake to the Max."  The photo of a three-layer chocolate extravaganza looked like something my hubby would drool over, and, as his birthday was coming up, I showed him the pic and asked him if he'd like me to try making it for his birthday.

Guess what he said!

From that time on, it has been the only cake he wants for his birthday.  It's a tradition now!  The ripped-out pages of the magazine are torn and stained from years of use. lol

The cake is soooo rich, it needs to be shared with as many people as possible. :)

Enjoy!

Chocolate Cake with Chocolate-Sour Cream Frosting


Ingredients:
  • 3/4 cup butter, softened
  • 3 eggs
  • 2 cups all-purpose flour
  • 3/4 cup unsweetened cocoa powder
  • 1 teaspoon baking soda
  • 3/4 teaspoon baking powder
  • 1/2 teaspoon salt
  • 2 cups sugar
  • 2 teaspoons vanilla
  • 1 1/2 cups milk
  • Chocolate-Sour Cream Frosting (see recipe below)
     
     
    Directions: 1. Allow butter and eggs to stand at room temperature for 30 minutes. Meanwhile, lightly grease bottoms of three 8-inch round baking pans or two 8x8x2-inch square or 9x1-1/2-inch round cake pans. Line bottom of pans with waxed paper. Grease and lightly flour waxed paper and sides of pans. Or grease one 13x9x2-inch baking pan. Set pan(s) aside.
    2. In a mixing bowl stir together the flour, cocoa powder, baking soda, baking powder; and salt; set aside.
    3. In a large mixing bowl beat butter with an electric mixer on medium to high speed for 30 seconds. Gradually add sugar, about 1/4 cup at a time, beating on medium speed until well combined (3 to 4 minutes). Scrape sides of bowl; continue beating on medium speed for 2 minutes. Add eggs, one at a time, beating after each addition (about 1 minute total). Beat in vanilla.
    4. Alternately add flour mixture and milk to beaten mixture, beating on low speed just until combined after each addition. Beat on medium to high speed for 20 seconds more. Spread batter evenly into the prepared pan(s).
    5. Bake in a 350 degree F oven for 35 to 40 minutes for 8-inch square pans and the 13x9x2-inch pan, 30 to 35 minutes for 8- or 9-inch round pans, or until a wooden toothpick inserted in the center comes out clean. Cool cake layers in pans for 10 minutes. Remove from pans. Peel off waxed paper. Cool thoroughly on wire racks. Or place 13x9x2-inch cake in pan on a wire rack; cool thoroughly. Frost with desired frosting. Makes 12 to 16 servings.

    Chocolate-Sour Cream Frosting

    Yield: enough to frost tops and sides of two or three 8- or 9-inch cake layers
     
    Ingredients:
    • 1 12 ounce package (2 cups) semisweet chocolate pieces
    • 1/2 cup butter
    • 1 8 ounce container dairy sour cream
    • 4 1/2 cups sifted powdered sugar (about 1 pound)
     
    Directions: In a large saucepan melt semisweet chocolate pieces and butter over low heat, stirring frequently. Cool for 5 minutes. Stir in sour cream. Gradually add powdered sugar, beating with an electric mixer until smooth. This frosts tops and sides of two or three 8- or 9-inch cake layers. (Halve the recipe to frost the top of a 13x9x2-inch cake.) Cover and store frosted cake in the refrigerator.

Wednesday, November 23, 2011

Cranberry Raspberry Salad

I don't have a photo at this time, but here is a cranberry dish that even children love! My nephew requests it every year. :) I would have posted it sooner had I thought of it, but maybe someone out there still needs to run out to the grocery store . . .  ;)

Cranberry Raspberry Salad

1 large package raspberry Jello
1 1/2 cups boiling water
1 cup cream, whipped
2 cups mini marshmallows
1 (20 oz) can pineapple tidbits or chunks, drained
1 can whole cranberry sauce

Mix and dissolve Jello in water. Let it start to congeal and then whip. Add whipped cream and remaining ingredients. Put into glass pan. Let set in refrigerator.

Tuesday, November 22, 2011

Pilgrim Hat Cookies--easy, easy, easy! :)


Ha ha--there's my 2nd bottle of antibiotics, with all its warning labels! 
Pilgrim hat cookies!  They're so cute and easy, and I saw the recipe right before my young friend Ella and her brother David were going to be coming over, so I made sure we had the ingredients.  Ella has told me she loooooves to cook and bake (neither of which this "recipe" actually requires, but, oh well!), so I wasn't surprised at her enthusiasm to make these with me.  Please don't get me wrong--I wouldn't trade my precious son for a million girls, and he actually enjoys cooking sometimes, but how fun is it to have a girl come to visit and want to do "girl stuff?!"

Now, adult to adult, I can't in good conscience say that these are the most delectable-tasting culinary creations you'll ever allow to melt in your mouth!  Some people might like them, but I had to eat each part of the hat separately because the thought of all those flavors mixed together was not pleasant for me, and even at that it was so very sugary sweet.  But, again, they are fun and cute, and kids think things like that taste great! ;)

Sweet Ella :)

Here's what you need:

32 fudge-striped cookies
32 miniature peanut butter cups
32 orange Tic-Tacs (or tiny orange Chicklets)
     Or an equal amount of these first three ingredients--however many you   want to make
1 cup vanilla frosting
7 drops yellow food coloring

Mix the frosting and food coloring.  The recipe I read said to dip the larger side of the peanut butter cup into the frosting before placing it on the center of the solid chocolate side of the cookie.  I found it easier and less messy to place the frosting in a Ziploc and cut off the tip of one of the bottom corners and pipe the frosting on to the peanut butter cup.  Press down on the peanut butter cup so a band of frosting shows around the bottom.  Then add a Tic-Tac for the buckle.  The recipe I saw used miniature Chicklets but apparently the stores around here don't carry them, so Tic-Tacs were an adequate substitution. :)

David waiting in anticipation to sample :)


I believe this recipe originated with Taste of Home, but I saw it on Women Living Well.


Thursday, July 14, 2011

Strawberry Heaven

Yesterday we honored "Strawberry Heaven" (or "Strawberry Shortcake Day"), our annual tradition of eating strawberry shortcake, and only strawberry shortcake, for dinner one day a year.  No, not for dessert after dinner, but for our actual dinner.  This is especially fun since we rarely have dessert after dinner, let alone for dinner.

Normally, our Strawberry Heaven occurs during peak strawberry season, when our own berries are thriving and we pick ever so many and ask everyone we see if they would like to pick some as well.  This year, however, our strawberry patch never thrived and we only picked a handful.  I almost forgot about Strawberry Shortcake Day until I saw strawberries for $1/lb at Aldi this week.  That's the best price I've seen them all summer!

Now, I have in years past bought those ready-made dessert shells you always see by the strawberries at the grocery, and they are fine in a pinch.  I've also made different kinds of cake to use with strawberries, all of which were fine, too.  I had it in my head this year, though, that it was time to try something different.  I wanted to make something, but it needed to be easy, too.  The recipe I used turned out to be our all-time favorite and will probably now just be part of the tradition.  I tweaked a recipe I found online.
Not the prettiest presentation. :)  But yummy just the same. 

It was so simple--its base is Bisquick!  Not the recipe on the box for strawberry shortcake, but a variation of it.  This recipe is sweeter, but not as sweet as those store-bought dessert shells.  We thought this was perfectly sweet.  And you bake it in a cake pan, which is easy and convenient.  It's a winner!  Thought I'd share it with you. :)

For the shortcake:

2 1/3 cup Bisquick
1/2 cup milk
3 tablespoons butter, melted
1/2 cup sugar
1/8 teaspoon cinnamon

Preheat oven to 425*.  Combine Bisquick, milk, butter and sugar until dough forms.  Press into a round cake pan and bake for about 12 minutes.  Half-way through baking time, sprinkle cinnamon over top.

I let it cool for awhile, but served it when it was still warm.

For the strawberries, I just washed them, cut the tops off and cut the strawberries into quarters or so.  Sprinkled them with a bit of brown sugar (learned that trick--using brown instead of white sugar--from my mom. Tastes yummy with strawberries) and let them sit while the cake was baking/cooling.

To serve:  I cut the cake into wedges, split each wedge into two layers.  On each plate I placed a layer of cake, topped with strawberries and whipped cream (or Cool Whip) and then repeated the layers.

So easy.  So good! :)

Thursday, September 23, 2010

Grilled Greek Chicken Kabobs

So easy and absolutely tasty!
GRILLED GREEK CHICKEN KABOBS
1/2 cup KRAFT Greek Vinaigrette Dressing
2 Tbsp.  KRAFT Real Mayo Mayonnaise
1-1/2 lb. Boneless skinless chicken breasts, cut into 1-inch pieces
1   Red onion, cut into small wedges
1 Lemon, halved

MIX dressing and mayo; pour over chicken in shallow dish. Stir to evenly coat chicken. Refrigerate 20 min. to marinate.*

HEAT grill to medium-high heat. Remove chicken from marinade; discard marinade. Thread chicken and onions alternately onto skewers.
GRILL 8 to 10 min. or until chicken is done, turning occasionally. Meanwhile, place lemon, cut-sides down, on grill grate next to kabobs; grill until heated through.
SQUEEZE lemon juice over kabobs just before serving.

*You can marinate up to 2 hours--that's what I did this time and it was even more flavorful.

Serve with salad or your favorite veggie.  Yummo! 

By the way, I got this recipe years ago from my sister, and I think she got it from one of those free Kraft magazines.  :) 

Monday, July 19, 2010

Blueberry Crumb Bars

Wondering what to do with all those blueberries you picked and froze?  Blueberry recipes are among the best--at least we think so in our house!  Here's one I've been making for years, and they are a hit wherever I take them!  Not one of the healthiest recipes, but don't blueberries have antioxidants or something? ;)  Take them to a carry-in (that's what potlucks are called around here) so you can enjoy a little while sharing the calories with others! :)

BLUEBERRY CRUMB BARS

Ingredients

  • 1 cup white sugar
  • 1 teaspoon baking powder
  • 3 cups all-purpose flour
  • 1 cup shortening
  • 1 egg
  • 1/4 teaspoon salt (optional)
  • 1 pinch ground cinnamon (optional)
  • 4 cups fresh blueberries
  • 1/2 cup white sugar
  • 3 teaspoons cornstarch

Directions

  1. Preheat the oven to 375 degrees. Grease a 9x13 inch pan.
  2. In a medium bowl, stir together 1 cup sugar, 3 cups flour, and baking powder. Mix in salt and cinnamon, if desired. Use a fork or pastry cutter to blend in the shortening and egg. Dough will be crumbly. Pat half of dough into the prepared pan.
  3. In another bowl, stir together the sugar and cornstarch. Gently mix in the blueberries. Sprinkle the blueberry mixture evenly over the crust. Crumble remaining dough over the berry layer.
  4. Bake in preheated oven for 45 minutes, or until top is slightly brown. Cool completely before cutting into squares.